PREPARE LAMP ROD
- Simple Depth Gauge
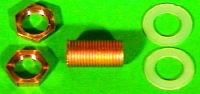
- Lamp Rod Parts.
- Calculate lengths.
- Cut Lamp Rod.
- Threadlock Glue.
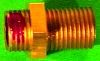
- Glue on 1st nut.
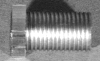
- Nylon Washer.
This is a very simple depth gauge that is use to determine how long of a threaded lamp rod will be needed. It's just a pencil, two rubber bands, and another long rod. First align the tips of the pencil & the rod so the ends are flush. Next, insert this device into the neck of the bottle. When you arrive at the new hole, push the long rod through the hole, leaving the pencil to stay against the inside wall of the bottle. When the rod becomes visible on the other side, STOP. As you pull out this device, you will have a measurement of the thickness of the hole.
To determine the cut length of threaded lamp rod, simply add
(1) determined depth from depth gauge above.
(2) thickness of two washers.
(3) thickness of two 1/8 IP locknuts.
(4) optional - add width of 1 or 2 threads if you want a little extra.
Go ahead and cut threaded lamp rod and deburr the ends. If you use a vise to hole the lamp rod, be sure to protect the threads from damage. Use something soft, like rubber, plastic, soft metals, etc between the steel vise and lamp rod. I use a PCV pipe with a 3/8"+ diameter hole.
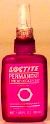
This is threadlock adhesive I use to fasten one of the 1/8 IP locknuts to one end of the threaded lamp rod.
It is desireable to have one locknut secured on one end of the lamp rod, so if you don't have the red threadlock adhesive, you might try substuting a super glue, PL Premium (with 24 hour cure), or jamming two locknuts (but allow longer lamp rod for extra nut), mechanical staking, roll pins, or whatever.
It's really hard to beat the threadlock adhesive because of it's strong gripping power and speed of setting up.
Just a drop of red threadlock is needed.
Spin the locknut all the way to the edge of the lamp rod. As the locknut covers the threadlock adhesive, the "lack of air" causes the adhesive to cure. Allow about 5 minutes for adhesive to set up hard. If you happen to accidentially get a sweet taste of this adhesive, it's because of the sweetness of the poison called "strychnine", so keep you hands out of your mouth if you get it on your hands. Now that I've scared you, don't worry, there's probably not enough strychnine in a bottle to hurt anyone. But still, be cautious, don't let the students make milk shakes with it.
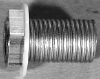
Slip one nylon washer on. The will be the subassembly which will be inserted into the bottle first.
Now you need to either make two LONG socket wrenches below or use two commercially available socket wrenches with long extensions. Making your own is very cheap and fast.